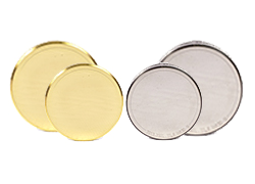
Yamamoto standard test block for hardness standardized to determine the average hardness of the block surface by MSP Metrology (M) Sdn Bhd from Yamamoto Japan

| Assortment | Hardness Value | Tolerance | Calibration Number | Variation (R=Max-Min) | Materials (JIS Notation) | Dimension (mm) | Finished Surface | Standard Based |
| HMV (1, 0.1) | 1650 | ±10% | 4(2×2) | 2% (HV1) | Si3N4 | Ø10×5 | Super Finish | JIS B 7735 |
| HMV (1, 0.1, 0.01) | 900, 800, 700, 600, 500 | ±15 | 6(3×2) | 5% (HV0.1) | SK85 | Ø25×6 | Super Finish | JIS B 7735 |
| – | 400, 300, 200 (Be Copper) | ±15 | – | – | C1720P | Ø25×6 (2) | Super Finish | – |
| – | 100 (C2600P), 40 (C1020-) | ±10 | – | 7(100HV0.1), 4(40HV0.1) | ← | Ø25×5, Ø25×6 | Super Finish | – |
| HMV (0.1, 0.01, 0.001) | 30 (AU) | ±10 | – | 4(HV0.1) | Au | Ø25×5 (0.8) | Super Finish | – |
| UMV (0.01, 0.002) | 900, 700 (Berkovich 9.8mN tested) | ±20% | 6(3×2) | 10% (HV0.01) | SK85 | Ø25×6 | Super Finish (Fine) | JIS B 7735 |
| – (0.01, 0.002) | 500, 200 (-) | – | – | – | SK85, C1720P | Ø25×6 (2) | Super Finish (Fine) | – |
| *Nano Indentation Hardness Blocks | APPROX340 | 6(3×2 HV, Nano) | Syngle Crystal | Ø25×6 | Super Finish (Fine) | JIS B 7735 | ||
| HN-W | HV0.001 | Tungsten | (W:Ø9×6) | |||||
| (HV0.01, 0.001 Berkovich 9.8mN tested) | ||||||||
| HV (30, 1) | 1000(SK120), 900, 800, 700 | ±15 | 10(5×2)/HV30, 10 | 1.5% | SKS3 | Ø64×15 | Buffing | JIS B 7735 |
| HV (10, 1) | 600, 500, 400, 300, 200(SK85), 150(S45C) | – | 6(3×2)/HV1 | – | ← | – | Buffing | – |
| – | 100 (C2600P), 40(C1020P) | ±10 | (150HV and below 2.2% | ← | Ø64×10 | Buffing | – | |
| HS | 100(SK120), 95,90,80,70, 60,50, 40, 30 | ±2 | HV10(5×2) | VHS≤1.5(70HS and below 1.2) | SK85 | Ø64×15 | Buffing | JIS B 7731 |
| – | 20(S20C), 7(C1020PØ64×10) | – | HS10(5×2) | ∠HS(HS-VHS)≤0.5 | ← | – | Buffing | – |
| HL | HLE(Dia)850, 800, 700, 600, 500 | ±15 | (HV Calibration) | SK85 | Ø115×33 | Buffing | JIS B 7731 | |
| – | HLD(WC)880, 830, 730, 630, 520 | – | – | – | Buffing | Related | ||
| HRC | 70(SK120), 67, 64, 62, 60 | ±1 | 10(5×2) | 0.2 | SKS3 | Ø64×15 | Buffing | JIS B 7730 |
| – | 57, 55, 50, 45, 40, 35, 30, 25, 20, 10 | – | – | (40HRC and below 0.3) | SK85 | – | Buffing | – |
| HRA | 87, 85, 83, 81, 78, 75, 71, 65, 56 | – | – | 0.3 | Same as HRC | – | Buffing | – |
| HR30N | 83, 81, 78, 73M 67, 60, 55, 50, 41 | – | – | 0.6 | – | – | Buffing | – |
| HR15N (45N) | 92, 90, 87, 85, 80, 75 (43) (23) | – | – | – | – | – | Buffing | – |
| HRBS | 100, 95, 90 | ±2 | 10(5×2) | 0.8 | SK85 | Ø64×10 | Plate Lapping | JIS B 7730 |
| – | 82, 72, 62, 52, 42, 32 | – | – | (50HRB and below 0.1) | C2600P | – | Plate Lapping | – |
| HR30T S | 78, 72, 62, 52, 42, 38, 32 | – | – | 1.0 | Same as HRB | – | Buffing | – |
| HR15T S | 87, 82, 78 | – | – | – | – | – | Buffing | – |
| HR (E•M•L•R•F•S) | HRE90 HRM107 HRL118 HRR123 HRF90 | – | – | – | (100HV) | – | Buffing | JIS K 7202 |
| – | HRM67 HRL92 HRR105 HRS90 | – | – | – | (40HV) | – | Buffing | – |
| HBW (10/3000) | 600, 550, 500, 450, 400, 350 | ±15 | 6(3×2) | 1.5% | SK85 | Ø115×18 | Fine Grinding | JIS B 7736 |
| – | 300, 25, 229(d=4mm), 200, 180 | – | – | – | – | – | Fine Grinding | – |
| HBW(10/3000) 150, HBW(10/500) 125 | – | – | 2.5% | S45C | – | Fine Grinding | – | |
| HBW(10/500) 100 | – | – | 3% | S10C | – | Fine Grinding | – | |
| HRC | 67, 64, 62, 60 | ±1 | 6(3×2) | Ø50.8×6.4 | (ASTM E-18) | |||
| HRC | 55, 50, 45, 40, 35, 30, 25, 20 | (Ø2″x1/4″) | ||||||
 Malaysia