Swimming Pool Pump Repair
- Understanding the parts of your pool pump is simple enough, and that is the goal of this blog post. Let’s start by breaking down the typical parts of a pool pump, with some typical problems and solutions.

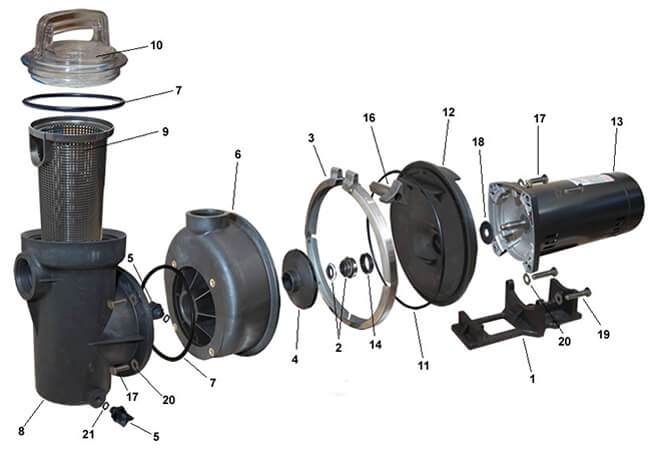
- Also known as the strainer pot, the hair and lint pot has a pump basket (9) acting as a pre-filter for the pump, to strain out particles that would clog the impeller. The strainer pot must be air tight for the pump to work properly, and when it is, the pump basket is under a vacuum, so any small void in the works will suck in air, eventually causing the pump to lose prime. There are four areas that this could occur – where the pipe enters the hair & lint pot, and on the opposite side where the pot bolts (17) to the volute (6). Air can also leak from the o-ring (7) that fits around the pump lid (10), and through a loose drain plug (5), or one that is missing an o-ring (21). Water left inside a hair & lint pot during freezing weather will almost certainly crack the hair & lint pot.

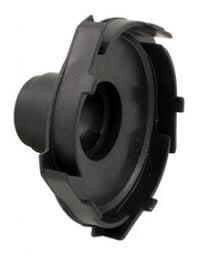
- Also known as the impeller housing, the volute is designed to create pressure by diffusing the water as it is thrown out of the impeller (4) vanes. Some pool pumps also use a diffuser, (shown right) also known as an impeller shroud, which helps to increase pressure further on high head pumps. The volute also requires an air tight connection on all sides, to prevent air and water leaks. Air leaks on the front if the connection to the hair & lint pot is loose, and water leaks to the rear, if the connection to the seal plate (12) is loose, or if the drain plug on the bottom or the pipe carrying water out of the volute, is loose.
- The seal plate makes a seal against the volute, with the assistance of the seal plate o-ring (11), and the clamp band (3), or sometimes with a set of nuts and bolts. Loosening the clamp knob (16) allows one to “crack the case”, or open up the pump to inspect the impeller (4), and remove the motor from the ‘wet end’ of the pump. The seal plate also holds the smaller half of the shaft seal (14), press-fit into the center of the seal plate. The motor bolts to the back of the seal plate with the motor shaft extending through the seal plate. The other half of the shaft seal (2) is installed onto the motor shaft, and the impeller threads onto the end of the shaft. The longer motor bolts (19) run through the motor support bracket (1).
- The electric motor has a particular horsepower, voltage and service factor. It also has a particular flange type, either square or round on the shaft end. A slinger (18) comes with the motor, a small rubber gasket that rides on the shaft to sling away any water that makes it past the shaft seal. On the back cap of the motor is a 3/4″ hole that allows you to thread in a wire connector, to bring the wires into the motor. Also in the rear of the motor are parts such as the capacitor, a centrifugal switch and the terminal board, where the wires connect.

- The electrical motor is the back half of the pump, connected to the front half of the pump (sometimes called the wet end) by a seal plate, which bolts or clamps the two pump halves together.
- Motor problems could have symptoms of not starting, overheating, or a loud, screeching operation, which indicates that the shaft bearings have gone bad.
- Pump Problems (wet end) includes all of the parts where the water moves through, such as the pump pot, pump basket, volute, impeller and diffuser; sealed up with several gaskets and o-rings, and a mechanical seal on the motor shaft.
- Wet end problems include leaking – air or water, broken baskets, worn seals or o-rings, clogged impellers or diffusers, cracked volutes.
- Once you determine the items that are causing the issue (call us if you need help), you can price out the pump parts needed, and determine if it makes sense to repair the pump, or replace the entire pump and motor.

1. The cost of pump or motor repairs is less than the cost of a replacement pump. Check out our Pool Pumps
2. Your motor (or pump) is less than 5 years old. Motors can last up to 10 years, so if you have lots of life left in the motor, repairing the pump may be wise.
3. You want to avoid any plumbing work involved in connecting the new pump.
4. You enjoy tinkering with your pool equipment, and solving simple mechanical or electrical problems.
1. You Live in Arizona, California, Florida, Nevada or Texas. If you have a standard motor over 1hp, and are located in one of these energy conserving states, the law requires most pools to install an Energy Efficiency Pump .It is usually calls for either a dual speed or variable speed pool pump (or motor) be installed.
2. Your pump is undersized or oversized for the application. If the filter pressure is running 20-30 psi, your pool pump may be too large. Switching pumps to a lower flow model, or changing the pump or motor/impeller to a lower horsepower, can reduce pressure, improve flow, and reduce energy consumption.
Undersized pumps, although less common, could be having trouble keeping the pool clear, or may require nearly 24 hour operation to do so.
3. Your motor is older than 5 years, or has suffered fatal damage -and- there are other expensive parts that also need replacing.
4. You don’t enjoy tinkering with equipment, and would prefer to have a reliable new pump with a new factory warranty.
The best match would be to replace with the same make and model pump you have now, unless you found it’s flow rate to be severely lacking, or you are required to install a variable speed pump.
When your pool was originally designed, we can assume that the designer did the math, adding up all of the flow resistance, measured in feet of head, and selected a pump and filter based on these computations. The plumbing portion of pump installation will usually be easier if you replace like with like, as the height and setback of the in and out ports of the pump will line up with your existing plumbing configuration.
If however, your old pump is no longer made, or not made in an energy efficient model, or the entire pump and filter system is being renovated, you can switch pump models or manufacturers without a problem. Most important in changing pump models is to use the flow charts to get as close as possible to the flow rate and pipe height and setback measurements of your existing pump.
Remember to match horsepower, pump type and flow rate. Use the Flow Rate Charts, (see sample chart below) based on a average feet of head (vertical axis) of 20 feet. This is the only true way to compare pump to pump flow rates. Since you probably don’t know the exact amount of resistance in your system, measured in feet of head, use an average amount, say 20 ft, when comparing your existing pumps flow capacity to a different make and model pool pump.

 Malaysia